Showing posts with label fashion/beauty. Show all posts

Wednesday, July 8, 2015

Downton Abbey Inspired Haul

Since the season finale of Downton Abbey, I’ve been pining for the next—and sadly, the last—season of the hit television show. I love historical dramas. I love the historical component (which isn’t typically that accurate), I love the world building, and I love the costumes. From gowns to hats to pieces of jewelry, the costume department on Downton does an incredible job at bring the 1920s to life.

Lady Rose MacClare (played by the stunning Lily James) definitely has some of my favorite costumes on the show. She’s youthful and bubbly but still elegant and sophisticated. One of my favorite accessories of hers are her hats and headbands, all of which add a hint of drama.

So, when I was out shopping for my “vacation wardrobe” I couldn’t pass up the opportunity to buy a couple Rose MacClare inspired headwear. The two headbands—one a gold braid and the other an ornate silver design—were fished out of the clearance section at DSW. I didn’t spend more than $5 on either of them which I thought was a steal! I have to admit that I felt a bit like a princess when I tried on the silver one. And we all deserve to feel like royalty every now and again, don’t we?

I’m looking forward to trying out the headbands while I’m in France, but I’m also toying with an idea of doing a post on styling with them. Thoughts? We’ll see if I’m that inspired though.

The earrings were another Downton Abbey-inspired purchase, although far less obvious. I loved the fact that the earrings have this long, thin chain which reminded me of a bit of fringe. I bought them at New York and Company during their Fourth of July sale as a door-buster. How could I resist them?

Friday, July 3, 2015

Revlon ColorStay Gel Envy


I’ve been seeing ads and commercials for Revlon’s ColorStay Gel Envy collection everywhere for months and finally bought it last weekend. The concept of the collection is that it’s supposed to give you a salon-quality manicure at home. Honestly, my feelings are a mixed bag.

I’ll start with the good news because I like being optimistic.

The Gel Envy polish real does give you a lovely and vibrant color, and there are 38 shades for you to choose from. Not too shabby, right? There are few things that I love more than pink nails, so I went with “Royal Flush.” It’s a rich pinky-red with maybe a bit of fuchsia to giving it a bit of sass. I really loved and maybe have just found my vacation nail color!

I found the application super easy. The Gel Envy process has two-steps, the base + color coat and the Diamond Top Coat. The base + color coat is a thick, opaque formula, so I only needed one coat. And even with the one, my nails had a gorgeous, rich color to them. The Diamond Top Coat was just as effortless, and I’ve honestly never seen a top coat dry so fast! And the system has no UV component, which saves everyone some time and money.

Lastly, my nails did feel harder and stronger while wearing the polish.

And now for the bad news…

This is another one of those gel-like nail polish systems that promises long-wear and a high gloss shine. It did give a nice enough shine, but I wouldn’t call it long-lasting. It didn’t chip per se, but by Day 2 I was already seeing some tip-wear on multiple fingers. It hadn’t even been 48 hours and I felt like I needed a touch-up. I wasn’t impressed. To its credit though, it’s Day 5 and there isn’t any flaking or major chipping going on yet.

The price is a bit of a turn-off too, at least initially. You need to buy both the base + color coat and the Diamond Top Coat, and each bottle is about $7.99 a pop. They do sell “starter kits” that have one bottle of color and one of the top coat, and that seems to be the way to go in order to save a few dollars for us penny pinchers.

Lastly, the thought the Diamond Top Coat had a funny smell, stranger even than other polishes I’ve tried over the years. Thankfully, since this system dries quickly the smell doesn’t linger.

The truth is that this is not a gel manicure. It’s gel-like so the results aren’t going to be the same. So, there are some pros and cons about the system, but I really do love the lush colors. And now that I have the Diamond Top Coat, I might try experimenting with other shades to see if they last a bit longer. The tip-wear did sour me a bit though, not going to lie.

Has anyone else tried ColorStay Gel Envy? What did you think about it?

*This post is not in collaboration with Maybelline, and the opinions are my own.

Monday, June 15, 2015

Maybelline Fit Me! Dewy + Smooth Foundation


Sometime last fall I decided to remove foundation from my daily make-up routine. I was convinced that the formula I’d been using for 5+ years was drying out my skin and making me break-out. Whether that was true or not, I decided to give my skin a break to see if it would clear up. For those of you who are curious, it did. But after five years of using a matte foundation 7 days a week, I’m sure my skin was grateful for some breathing room. Recently though, I’ve been reading a lot of beauty blogs and was inspired to give a different foundation a spin. Maybe foundations were like shampoos? It’s good to change them up from time to time? There had to be a formula out there that would leave my skin looking fresh. My other criteria were that I wanted to use a liquid foundation (rather than the mousse I’d been using), and I didn’t want a matte finish like my old foundation.

A couple months back I did a post on my quest for a new concealer and landed Maybelline Fit Me! Concealer. Although I said that it didn’t completely hide my heinous dark circles, I was pretty pleased with the results anyway—it brightened up my face and blended well. It’s since worked its way into my daily make-up rotation. When I saw that there were foundations in the same Fit Me! line, I figured that was as good a place as any to start my hunt for a new foundation. It was the best $7.99 I’ve spent recently.

I am honestly in love with Maybelline Fit Me! Dewy + Smooth foundation. It met all of my criteria (liquid foundation, a natural finish, and hasn’t caused any break outs) and then some. The formula also contains SPF 18 (fair skin needs love) and has no wax or oils that could clog my pores.

The foundation is very easy to blend, even for a liquid foundation novice like myself. Don’t laugh but this is the first time I’ve attempted to use a liquid foundation. I’ve been using a foundation brush to apply it and have been happy with the results. It’s a translucent base but seems pretty buildable to me, should you need a bit more coverage.

I didn’t know that a foundation could feel so light and airy, and that’s just one of the many differences between the Fit Me! foundation and my old one (which is now in a landfill somewhere, I imagine). You put this foundation on and can forget about because it looks and feels that natural. Trust me friends, “dewy” is the perfect word to describe how your skin feel while wearing it. With the matte finish foundations I always felt a bit painted on, and I had this image in my head that I was walking around with a powdered face à la Marie Antoinette. I just didn’t know there was an alternative and thought that everyone secretly felt that way. This formula is practically weightless. And the staying power is amazing too. I wore it in 90 degree weather this past week and there was zero make-up meltdown. That is a true test in my opinion.

Should you find yourself in the market for a foundation anytime soon, I’d suggest giving the Fit Me! line a try. There are the Dewy + Smooth ones and Matte + Poreless varieties to choose from (16 shades each). I went for the #125, Nude Beige, since my face tends to be paler than the rest of me. If you haven’t already figured it out this is a rave review for Maybelline. 

*This post is not in collaboration with Maybelline, and the opinions are my own.


Sunday, May 17, 2015

Wardrobe Wishlist: H&M

I’ve been talking about how I want to buy some spring/summer pieces to freshen up my wardrobe for a while now, so I decided I’d do my first wishlist post! I wanted to focus on one of my favorite brands—H&M. Their clothes is affordable (yay savings!), chic, and age-appropriate. A lot of the time I feel like certain brands cater to tweens/teenagers or mothers, but H&M does an amazing job at creating looks for 20 and 30 somethings. For this wishlist, I definitely had outfits for my vacation in mind, but I also wanted pieces that I could easily wear to work (publishing is fairly casual). The pieces I chose just seemed effortless to me. And yes, before you ask, I do really like the color green!

Tuesday, May 5, 2015

What's In My Bag? Work Edition


You know how some people collect shoes? Well, I might love me a pair of gorgeous pumps or badass boots, but I can’t say no to a new handbag. I love my burgundy Audrey Brooke cross-body bag from my March Monthly Favorites, but the color wasn’t exactly shouting “spring!” to me, so I thought it was time to switch bags. And while I was at it, I figured I’d do a “What’s in My Bag” post.

I’m a sucker for a good WIMB post for some reason. Are any of you? It seems a bit voyeuristic, to be honest, but it gives you an intimate portrait of the blogger who’s willing to spill their guts—or the contents of their bag—onto the internet. So, without further ado, here is my What’s in My Bag Work Edition post!

The Bag


I work full-time, so during the week I go for utilitarian when it comes to choosing a bag. It needs to be able to fit all the usual suspects (wallet, make-up, phone, etc.) while also being able to hold my lunch and whatever I might need to carry to and from work.

I fell in love with this London Fog satchel when I spotted it in DSW last spring. I loved the vintage shape of it and the color, which just seemed so cheerful. I’m honestly not a huge fan of pastels, but I couldn’t resist this bag’s charms! The pink with gold accents was just too perfect. I believe it cost me around $70 last year (but don’t quote me on that), and I used it well into the summer before reluctantly switching bags. The bag itself is pretty sturdy and it can hold a lot, surprisingly, so it met all my work needs.

The Contents


Reading Material – Since I love to read and work in publishing, I have a lot of reading material in my bag. I always have at least one paperback (currently The Secret History) that I read on the train as well as my Kindle Fire HDX. I use the Kindle to read manuscripts for work, but I also upload the New York Times to read in the morning since I’m a news and media junkie. I always keep a small notepad in my bag too, which I use to jot down blog posts and whatever creative writing I might be doing on the side. And to be very old-fashioned, I keep a train schedule in my bag even though I have the Train Time App on my phone…

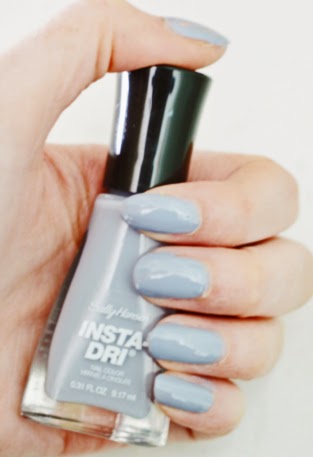
Beauty Essentials – I kind of suck when it comes to remembering to freshen my make-up during the day, but I always keep a lipstick or two in my bag. My daily look doesn’t usually include lipstick, but slicking some color onto my lips is my way of switching from a day to night look if I’m going out after work. I’m currently carrying Revlon’s Cherry Tart Colorburst Lip Butter and Maybelline’s Pinkalicious. I also carry a few loose hairpins or hair claws. This time of year, I keep a hand moisturizer in my bag, like Jergen’s Ultra Healing, to help repair the damage winter has done to my poor dehydrated skin. And lastly, I have my trusty sunglasses! These Miu Miu shades are my pride and joy. Their retail value is a couple hundred dollars, but I snagged them for $40 last summer. I absolutely adore them! The details on the side get tons of compliments, and I feel so confident (kind of like a movie star) when I’m wearing them.

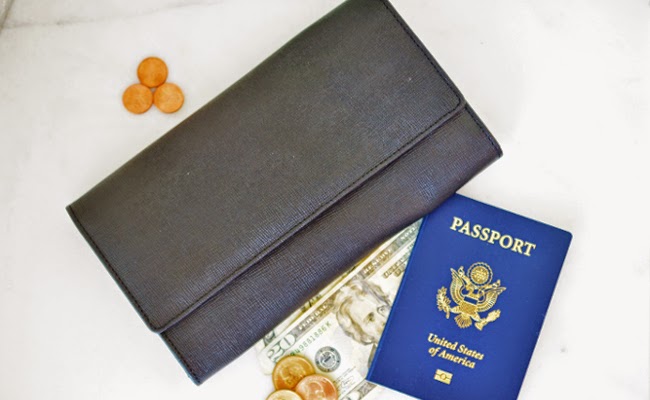
Bits & Bobs – Of course I always have my iPhone 5 in my bag along with a pen (or 5…) to write things down in my notepads. It probably goes without saying, too, that I keep my wallet and my monthly train ticket in my bag as well. My wallet, which I bought in a market in Florence last summer, is another of my pride and joys. It’s the softest leather I have ever felt, even if it is a bit boring as far as design goes.

So what are some of your bag essentials? Do you have anything in there that is completely utilitarian?

Wednesday, April 8, 2015

Quest for the Perfect Concealer


One of my goals this month is to freshen up my make-up bag, and first up is my quest for the perfect concealer!

I am afflicted with dark circles under my eyes (thanks Daddy). Is anyone else? No matter how much sleep I get, there will always be these dark somewhat purplish circles under my eyes. Ricky Raccoon much? I hate them with a fiery passion, and I’m pretty self-conscious over them too. I know—rationally—that the dark circles probably look a million times worse to me than they do to anyone else. But maybe not? In any case, with the exception of a couple of naughty blemishes that crop up around that time of the month, I use concealer primarily to cover up my dark circles.

I’ve been using Maybelline Dream Lumi Touch Highlighting Concealer for years now, but when I finished my last tube, I thought I’d give another product a try. I’d seen a lot about Maybelline Fit Me Concealer on some beauty blogs I follow (even heard it called a drugstore dupe for NARS Creamy Concealer), so I figured I’d give it a go.

Since I'm pretty pale (ghostly according to my tanned family), I went with the fair shade which also had a slight pinkish tint to it. The fact that I haven't gotten sun all winter doesn't help matters. I do really like the formula and found it super easy to blend with my fingertip, and it didn’t feel heavy on my skin either.

Maybelline Fit Me Concealer did a great job at covering up blemishes and redness but was maybe not quite opaque enough to completely hide my dark circles--they're evil I tell you! It did brighten up that area of my face though, so I can’t complain too much (not to mention that it cost me under $6).  I’m not sure if my quest for the perfect concealer ends here, but I think I’ll keep playing around with this one until I’ve made my final decision.

What concealer do you use? Any tips for hiding those dark circles?

Friday, March 20, 2015

Designer for Less: Travel Wallet


I love Aspinal of London’s accessories, and ever since I discovered their travel collection I’ve been smitten. The gorgeous Italian calf leather luggage tags, passport cover, and tabbed travel wallet come in a variety of colors, and I’m more than a bit obsessed with the aqua collection. The only problem is that the set costs a whopping $325. Sadly, it’s not an expense I can justify when I travel abroad once a year, and that's a substantial chunk of my spending money for a month. Even if I just bought the travel wallet, which speaks to my hyper-organizational tendencies, it'd set me back $250. Yikes. Still, I was desperate for my own travel wallet and decided to see if there were any brands that made something similar with a more reasonable price tag.

I scoured the internet for ages before discovering that ASOS has travel wallets for $30-45, which is more my price range. The ASOS wallets are leather and have three tabs (passport, tickets, and other), which will help me to keep things organized,  and that makes all the difference in a travel experience, don’t you think? There’s nothing worse than having to rummage through your bag or carry-on to find your passport or boarding pass. The wallet is bigger than your average wallet, but considering what it’s meant to hold, that makes sense. The only thing “negative” point would be that the leather isn’t exactly supple, but I do like the textured leather. My wallet doesn’t seem to be available anymore, but ASOS has other similar styles right now.


I haven’t used mine yet, but it’s definitely going with me to France. Last year I was one of those poor individuals rooting through her handbag for her passport after it slipped into a side pocket, unbeknownst to her.  Can you imagine not having your passport when you get to the airport? I had a panic attack, and the experience probably shaved a couple years off my life. I’ll be eternally grateful to ASOS if my chic travel wallet prevents a repeat of last year.  Now to find myself a cute passport cover!

What are some of your favorite designer dupes?

Thursday, March 12, 2015

Love Your Skin with Olay Complete


It is a truth universally acknowledged that winter wreaks havoc on the skin. Or at least it should be a truth universally acknowledged. The cold weather leaves skin dry, chapped, and in a general state of disrepair. But since winter in the Northeast requires layers upon layers of clothing, it’s pretty easy to hide the problem. Spring is just around the corner though (hopefully), so soon there will be a lot more skin visible. That means it’s time to get my skin back into respectable shape.

I’m pretty lax when it comes to moisturizing my skin (I’m working on it, I swear!), but the one place I never skimp on is my face, especially in the winter. Olay is the only face lotion I've ever used thanks to both of my parents indoctrinating it in me. I have vivid memories of my father slathering “Oil of Olay” on my fat baby cheeks. Both my mom and dad use it to this day, although we all use different formulas.

I swear by Olay Complete with SPF 15. I’m pretty fair-skinned, so I always need a little bit of UV protection to prevent me from turning into a boiled lobster. I like the fact that the SPF is in my moisturizer so that I don’t have to worry about an extra step in the mornings when I’m getting ready for work.

The cream is light and smooth, so you hardly notice that it’s on. It’s also not oily like some lotions can be, which is important for someone with sensitive skin like me. The tiniest bit of oil on my skin and I break out; I’ve never had that problem with Olay Complete.  The fact that it also has vitamins E, B3, and C in it means that I know my skin is being nourished around the clock.  

At $5.99 a pot, I think Olay is a huge steal.  It’s part of my daily routine, and I put it under all my make-up. My skin feels supple and fresh, and knowing that it's well-hydrated and protected from the sun all year round is a huge plus.

Tuesday, March 3, 2015

Sally Hansen Insta-Dri Review


As much as I would love to spend $8 on a bottle of OPI or Essie, sometimes that price tag is too rich for my student loan-burdened bank account. I’m not ashamed to admit that I’m almost exclusively a drugstore cosmetics sort of gal at this point in my life. But just because I want bargain prices doesn’t mean I want nail polishes that chip the next day or need a million coats to look opaque. I've found that Sally Hansen Insta-Dri line is a great alternative to designer polishes.

For $3.99, you get a thick, long-lasting nail polish and a large selection of colors to choose from. Depending on the color, one coat will usually do the trick, and it goes on smoothly and evenly. The “Perfectionist Brush” is wider than the average brush and has contoured edges for easy application. 

Now, I will say that the name is a bit of a misnomer. The nail polishes don’t dry instantly (I wish!), and they don’t dry in 60 seconds either.  The dry time is still faster than most drugstore nail polishes I’ve tried though. I do still use a quick dry coat to speed up the process, but that’s only because someone has a tendency to smudge her nails…

A couple of weekend’s ago I bought two new Sally Hansen Insta-Dri polishes for my collection.  Show Steel-er is a light gray with a slight blue tint to it (from certain angles it even looks a bit like powder blue).  It seemed like a perfect winter color to me and certainly matched the New York uniform (black, white, and gray). I can’t lie, I’ve been obsessed with this color since I bought it.  

The other shade, Expresso, is a rich mauve. It’s a deep enough shade to work as winter color but I think the berry hue could work for the spring too. I like that it’s on the more subdued side without appearing too neutral.

My Sally Hansen manicures usually last about a week without chipping and with minimal tip-wear, but the darker colors don't seem to last quite as long as the lighter shades (as was the case with Show Steel-er versus Expresso), not sure why.  Still, Sally Hansen provide smooth, vibrant coverage that really can't be beat for the price.


Monday, February 23, 2015

Oscars Round-Up: Good, Bad, & Ugly

As we all know though, the Oscars are just as much about the movies as they are the fashion on the red carpet, don’t you think?  A lot of the time, the colors, styles, accessories, and hairstyles that we see at the Academy Awards and the after-parties inform the trends of the next year (or that’s how it seems to me).  There were a lot of red and pink dresses, and I have to say that I am a huge fan.

While the golden statues are in their new homes today with a worthy group of actors and actresses, today (and probably the next week or so) are all about the Oscar fashions.  Who were this year’s best and worst dressed?  Everyone has an opinion, including me.

My five best dressed are pictured above (in no particular order).  Rosamund Pike's Givenchy (one of my favorite designers) made her waist look so tiny, and the color just worked with her complexion.  Both Scarlett Johansson (in Versace) and Zoe Saldana (wearing Atelier Versace) just gave birth, but they were stunners in their body-con gowns.  I was a huge fan of how bad-ass Scarjo looked with that hair and statement necklace.  On the opposite end of the spectrum, Anna Kendrick's Thakoon Panichgul was a little princessy and sugary sweet but still gorgeous.  And Margot Robbie's Saint Laurent was the right amount of drama and accessorized beautifully.

Unfortunately, there were some looks that didn't do anything for me or made me think "oh my goodness, what were you thinking?"  Those looks are pictured below (also in no particular order). Carmen Ejogo's Houghton design just didn't work for me.  It looked a bit cheap and didn't suit her body type, in my opinion.  Nicole Kidman wore Louis Vuitton, but I think the color made her look washed out.  The style was rather boring too, which was the same problem I had with Kerry Washington's Miu Miu gown.  I felt like I could've gone into any bridal store and picked either dress off the rack.  Solange Knowles wore Christian Siriano (Project Runway anyone?), but the look just screamed cleric's robe.  A cardinal maybe?  And the pattern on Keira Knightley's Valentino just confused me.

Who were your picks for best/worst dressed?


So how did your predictions do? I did respectably by predicting 12 of 24 winners in the best foreign language film, sound editing, supporting actress, visual effects, production design, cinematography, documentary, original song, original screenplay, director, leading actress, and best picture categories.

I was surprised that Keaton didn't get leading actor, but I was so excited for Eddie!  His speech was adorable.  I also have to give some major props to Lady Gaga for that tribute to The Sound of Music (and to Julie Andrews for being such a class act).  And NPH delivered some zingers, but was a fantastically entertaining host.  What did you think of the show?  Did you stay up for the whole thing?

*Pictures by Getty Images.

Tuesday, February 3, 2015

DIY Acne Spot Treatment (That Costs Pennies)


Pimples have that way of popping up at the most inopportune times and then linger and linger and linger. If you’re like me, then you’ve tried every over-the-counter scrub, cleanser, and acne spot treatment that money can buy. You’ve probably also tried popping them or covering them up with make-up (which only seems to make matters worse). Pimples are unsightly and, even if it's small, I end up feeling like I have Mount Everest growing on my face for all to see (insert horrible images of people pointing and jeering here).

For me, there seems to be nothing I can do to stop one or two pimples from rearing their ugly heads (pun intended) at that time of the month. I try all sorts of pre-emptive maneuvers but the usual treatments don't seem to work in this one case.  But I did stumble upon an inexpensive DIY treatment that works for me and will hopefully work for you too!

You’ll Need...


  • 2-3 Aspirins (with no coating) - I typically use Bayer but Excedrin works too! 
  • Water
  • Mortar and pestle (or, like me, a makeshift mortar and pestle)


And The Steps...


  1. The moment you notice a pimple, set to work crushing 2-3 aspirins into a fine powder.
  2. Add just enough water (no more than a few drops) to the powder to create a thick paste. If it becomes too watery, then crush and add more aspirins.
  3. Clean afflicted area and hands. Apply a thick-layer of the aspirin paste directly to the pimple. Let paste dry.
  4. Reapply paste, adding water to rehydrate it as needed.

I tend to do this routine at night so that I can apply the paste 3 times (and I usually sleep in the third application). Admittedly, I wake up with a pillowcase covered in dried aspirin powder, but I think that’s a small price to pay! Plus, it’s easy to clean up. By morning, the offending pimple is greatly reduced in size and there’s considerably less redness. After repeating this process for a second night, my pimple is just about gone.  

There you have it-- an acne spot treatment that costs pennies!

A Few Things To Keep In Mind...


I've only used this as a spot treatment, and I've noticed that it works best for pimples that have a white-head (not those hard buggers that lurk just under the surface of the skin).  For severe acne breakouts, I'd still recommend Proactiv.  And remember that keeping your skin clean is a must to avoid pimples, blackheads, and other gross blemishes.

 Do you have any tricks for getting rid of pimples?  I'd love to hear about them. xx